Binder Jetting with ceramic
-
Additive manufacturing
Complete process development up to the 3D component made of technical ceramics
-
Binder Jetting
Binder Jetting - the powder bed based 3D printing with ceramic
-
Procedure
How does layering work in this 3D printing process?
-
Ceramic powders
What ceramic powders are used for this 3D printing process?
-
Inks
Which inks are used and how do they increase the density of the ceramic components?
-
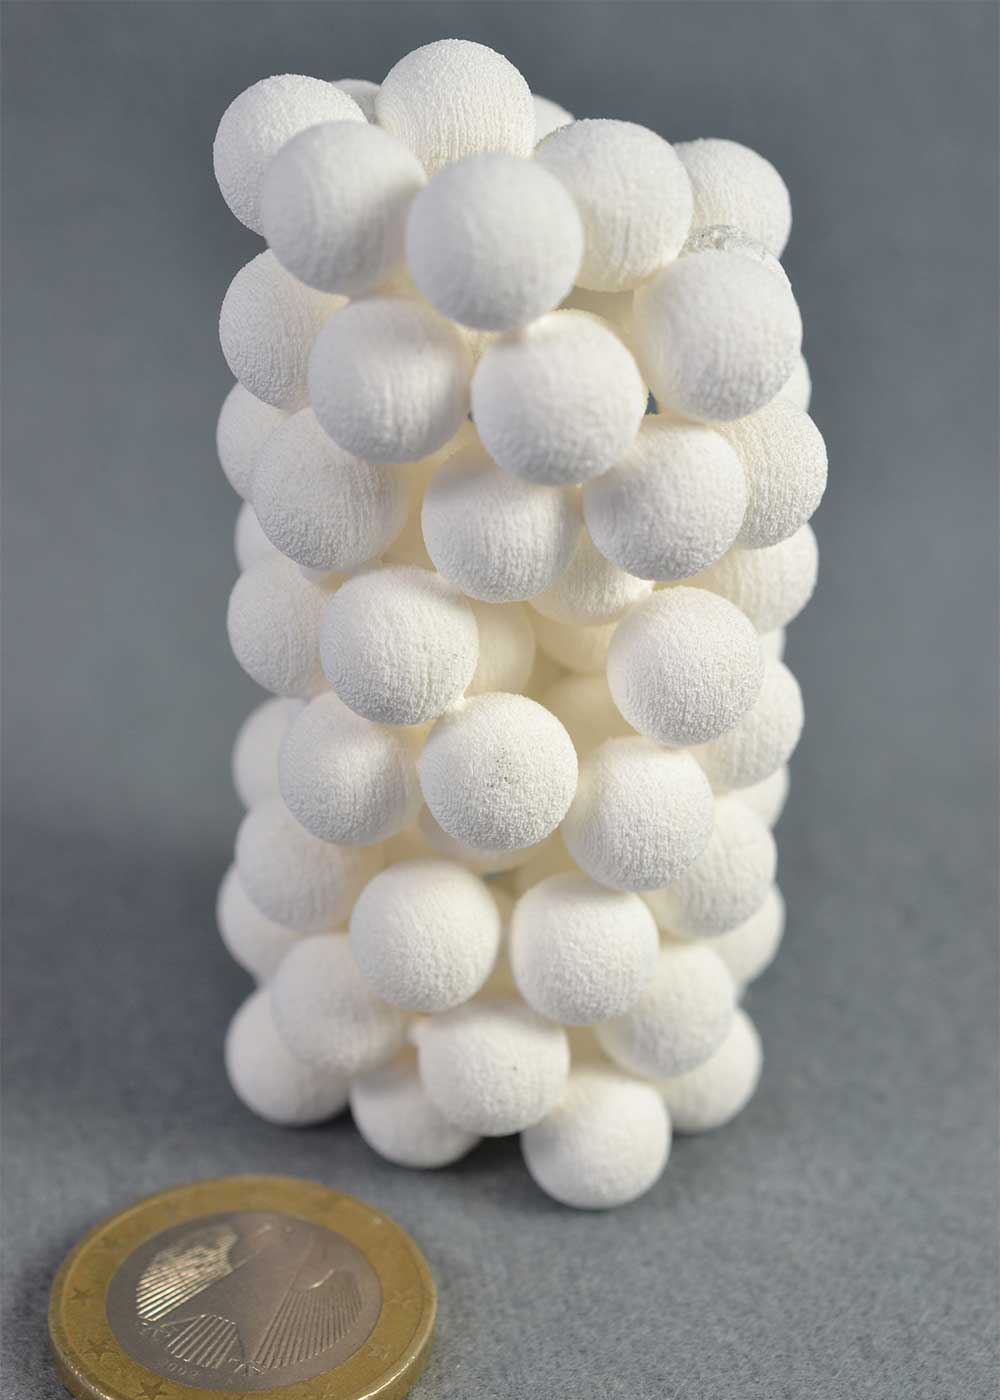
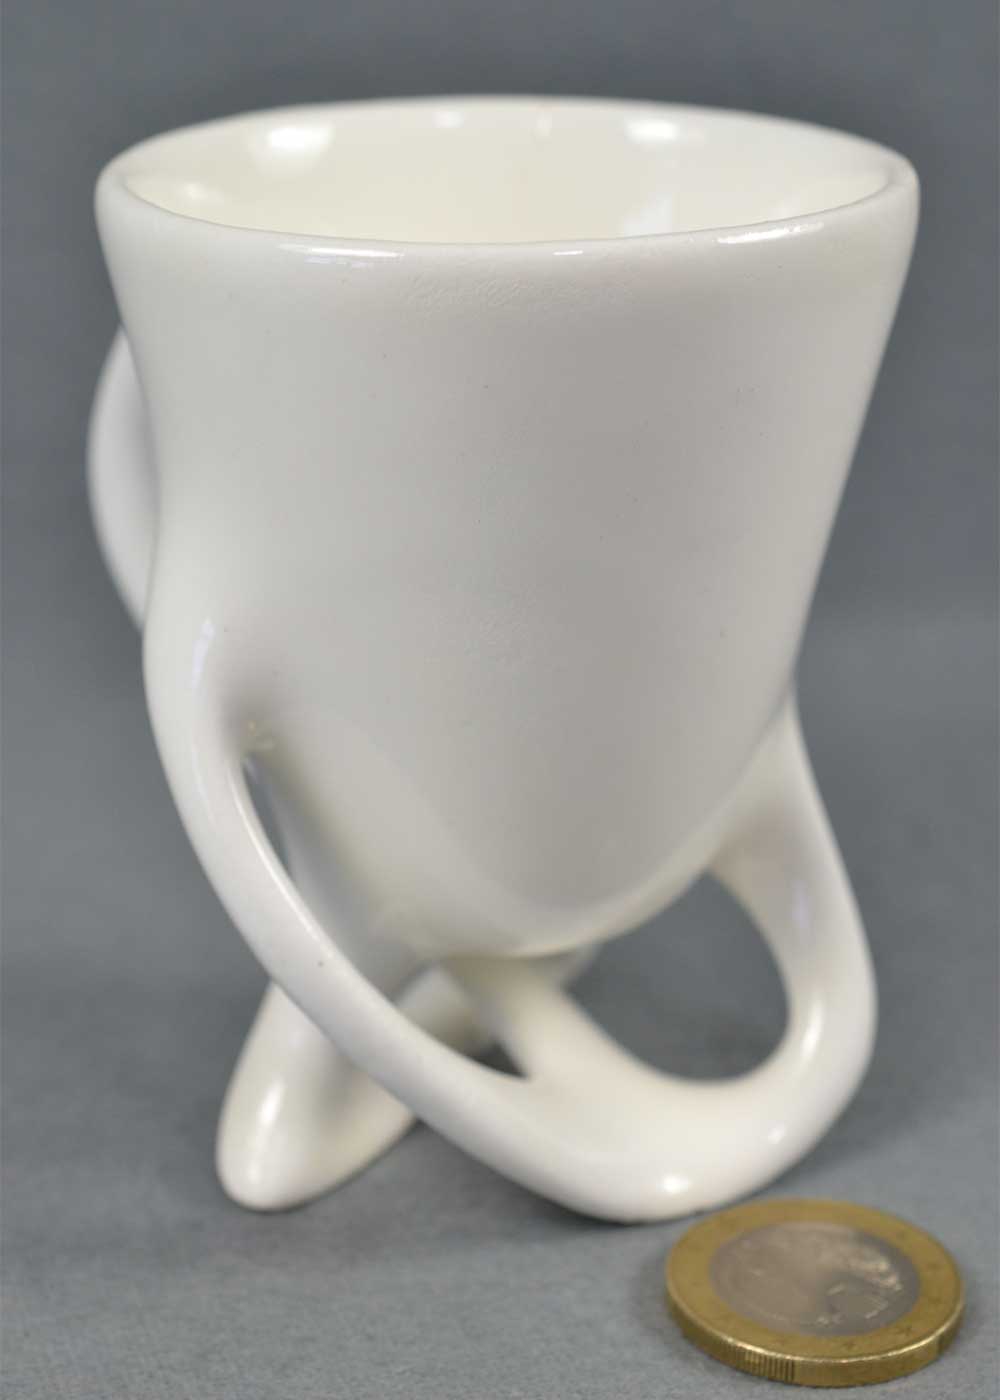
advantages & disadvantages
What are the advantages and disadvantages of the Binder Jetting process?
-
Restrictions
What are the restrictions for the design of components?
-
Contact person
Hakimeh Wakily
Additive manufacturing
Complete process development up to the 3D component made of technical ceramics
Due to our many years of experience and the tests described above, we can offer customers who want to enter into additive manufacturing the complete process from material development (powder and inks), process development, to the finished 3D-printed component.
No matter if material and process development or direct manufacturing of desired components from our standard materials CerPrint-Alox1 and CerPrint-LT01 – we have the know-how and the individual solutions for you.

Binder Jetting
Binder Jetting - the powder bed based 3D printing with ceramic
Binder Jetting is a form of additive manufacturing, often referred to as powder bed based 3D printing. The Binder Jetting process is based on inkjet technology. Similar to an inkjet printer, a substrate, in this case a ceramic powder surface, is printed using a print head. The template for the parts to be printed is provided as a CAD file, which is digitally divided into slices of the desired layer thickness (usually 50 – 200 µm). Instead of a ink, a liquid binder is used to bond the powder particles together. The powder is applied and printed layer by layer, whereby the powder bed moves down one layer in the z-direction after each printing process. The layers are applied by a rotating roller in x-direction, the print head moves in xy-direction. Thus the component is built up from bottom to top, with the remaining, unbound powder taking on a supporting function during this process.

Procedure
How does layering work in this 3D printing process?
A rotating roller transports the powder from the storage container into the building space. The aim is to produce a powder bed as dense as possible with a smooth, homogeneous surface. The layer thickness, which is adjusted to the respective grain size of the powder used, is decisive for this. On the other hand, the speed of rotation as well as the traversing speed of the roller plays a decisive role for the quality of the powder surface. These parameters are closely related to the flow properties and the compactability of the powder.

How does the printing process work in Binder Jetting?
The print head prints the first slice of the print file on the powder surface. Then the building space is lowered by the height of one slice, the storage container is moved up accordingly and the next powder layer is placed by the rotating roller. This process is repeated until the last slice is printed. The interaction between ink and powder is of great importance. If the binder saturation is too low, the layers will not bind together strongly enough to give the green body sufficient strength. If the binder saturation is too high, on the other hand, the geometry will be irregular because too many powder particles are bound. The decisive factor here is the wetting of the powder with the ink. If a drop hits the powder surface, it forms a spherical bond with the powder particles. The individual drops, including those of the previous layer, bond with each other due to capillary forces. If the distance between the drops is too small or the volume per drop is too large, the ink will “bleed” and thus cause irregular contours. On the other hand, if the distance between the drops is too high or the volume per drop is too small, the powder will not bound strongly enough and the printed components won’t have sufficient strength.

What happens after the 3D printing process is complete?
After the last layer has been printed, the component must dry in powder (2 to 8 hours depending on size). Then the component can be removed from the powder bed. The loose powder can be removed with a brush and/or compressed air. This produces the so-called green body, which is only held together by the printed and cured binder.

To finally obtain a ceramic body, the cured binder must be removed and the green body sintered. In our process this is done in one step. In our material-dependent firing curves, we initially run a relatively slow temperature increase for debinding. Then the temperature is increased up to the value at which the respective material is sintered. After the cooling phase, the finished ceramic component can be removed.
ceramic powders
What ceramic powders are used for this 3D printing process?
In general, any ceramic raw material (e.g. aluminium oxide, zirconium oxide, silicon carbide and many more) can be processed with Binder Jetting. Decisive factors are the particle size distribution, the particle shape, the density, as well as the specific surface of the powders used. On the one hand, these material properties indicate the flowability and compactability of the powders. On the other hand, very fine powders with a high specific surface area are crucial to ensure sufficient reactivity during the sintering process.
We at WZR have invested a lot of research and development in powder characterization. For example, we determine bulk and tapped densities, particle size distributions, dynamic flow behavior, and sorption behavior in contact with liquids. With the characterization methods, we are able to develop and produce powder mixtures from different raw materials with desired properties very quickly and in a targeted manner without the entire Binder Jetting process in order to be able to make a statement about the quality of the powder mixture.
Inks
Which inks are used and how do they increase the density of the ceramic components?
Simple liquid binders are printed as standard. These are liquids in which an organic binder is dissolved, which bonds the powder particles. Since ceramic components, which are produced by means of Binder Jetting, usually have a relatively high porosity, we have developed inks filled with ceramic particles, which can be processed with industrial ink systems and print heads. By using ceramic particles in the ink, which correspond to the powder bed, the density of the fired component can be significantly increased. In addition, the use of particles (ceramic or metallic) which do not correspond to the powder bed is possible. This opens up new possibilities for the production of multi-material components. The inks used must also have certain properties in order to be optimally processed in Binder Jetting. These include in particular viscosity, surface tension and time-dependent stability (phase separation, sedimentation). We also have our own laboratory with appropriate test methods for ink production and evaluation, which enables us to develop individual inks for the requirements of our customers.
advantages & disadvantages
What are the advantages and disadvantages of the Binder Jetting process?
Advantages Binder Jetting
- High process speed
- 30 seconds / printing layer
- Several different parts can be printed simultaneously
- No support material necessary
- The layered components are supported by the surrounding powder, which can also be reused
- Complex geometries
- Overhangs, undercuts, holes etc. are possible
- Due to the low layer thickness (50 – 200 µm), even filigree components can be manufactured with high accuracy
- Multi-material
- By using particle-filled inks, different materials can be printed into the component
Disadvantages Binder Jetting
- Mostly high porosity
- Since the powder is generally not highly compressed in the process, the components have a comparatively high porosity. This is dependent on the material and can be optimized with particle-filled inks.
- Low strength
- Due to the high porosity, the components have a comparatively low strength. Here too, optimization with particle-filled inks is possible
- Exposure from the powder bed
- The printed components must be removed from the excess powder. Depending on the complexity of the component, this can be very costly.
Restrictions
What are the restrictions for the design of components?

Maximum part size
180 x 180 x 150 mm (length x width x height)

Holes
diameter of the hole should be at least 1/10 of the length of the hole

Wall thickness
walls should have a thickness of at least 2 mm

Corners/edges
Should always be rounded

Cavities
Cavities must not be completely closed
Contact person
Hakimeh Wakily

- Hakimeh Wakily
- h.wakily@wzr.cc
- +49 2226 1698-28